Whittling Projects Using Your Christmas Tree
by Floris Books • 29 December 2018 • Crafts & Activities, Steiner-Waldorf Education • 0 Comments
Whittling is the perfect activity to keep children entertained in the winter months, and Frank Egholm’s wonderful book – Easy Wood Carving for Children – is packed full of more than 50 whittling projects for both new and experienced wood carvers alike. It has lots of practical tips on safe carving techniques and handling tools properly, and demonstrates the many creative possibilities of working with wood.
One of the best things about this traditional hobby is that it encourages young whittlers to make use of materials that are already readily available to them, and what project could be better at this time of year than these handy hanging hooks and candlesticks – all made from the branches of your Christmas tree?
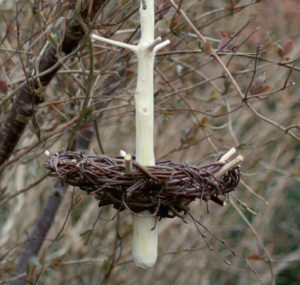
Hanging Hooks
These hanging hooks can be used for decoration, or even turned in to a bird’s nest for your garden.
 Materials and Tools
• A Branch where most of the length is above the side branches. The second ring of branches is usually the correct size.
• Whittling knife.
• Drill.
• String.
• Paint, oil or varnish (optional).
Method
1. Strip the bark. Work carefully and exactly, particularly the tricky bits between the main branch and side branches. It’s likely you’ll get resin on your hands so it’s best to wear gloves.
2. Round the ends and sand them if you want a smooth finish. You can whittle figures or designs in the main branch to decorate the hooks.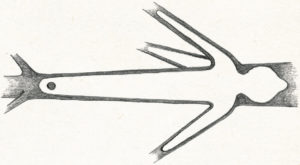
3. Drill a hole in the top part of the trunk (see figure) and knot the string in place.
4. If you want to, paint or varnish your hanging hooks.
Candlestick
Materials and Tools
• Branch, diameter 4–5 cm (1½–2 in).
• Whittling knife.
• Metal candle cup, 12–14 mm (approx. ½–¾ in).
• Small screw.
• Candle, diameter to fit the candle cup.
• Paint for decoration (optional).
Method
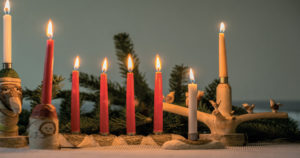
Making a pillar or flat candleholder (as seen to the left and in the middle above) is a fairly simple project:
- For the pillar design, the height of the candlestick is dependent on the size and weight of the branch; if necessary, attach a larger tree slice as a base to stabilise it.
- For the flat design, the branch should be split or sawn in half lengthways.
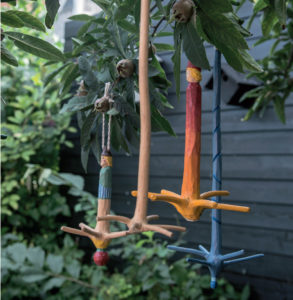
The candlestick on the right above is a little more advanced and is made out of the tip of the Christmas tree with small birds perched on the side branches. To make this kind of candlestick, first follow the hanging hook instructions above.
1. Whittle the shape of the candleholder. You can make decorative patterns or even create a figure (advanced).
2. Screw the cup in place or drill a hole to insert it into. Make sure to countersink the screw from below so your candle sits flat on a surface.
3. If you want to, paint or decorate your candlestick.
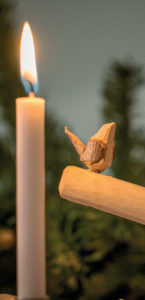
Adding the Birds
The above method will create a beautiful candleholder, but these birds can be made separately and fixed to the branches if you like.
 Materials and Tools
• Y–shaped branch (as shown in the below figure). Make sure the tail part of the forked branch is long enough to hold while whittling the tail feathers.
• Whittling knife.
• Hand saw or folding pruning saw.
• Ink, coloured pencils or paint for decoration (optional).
Method
1. Saw the branch to the length you want it, making sure you can hold the figure while you whittle.
2. Carve the head first, then the body by cutting into the branch.
3. Narrow the tail at the sides, but leave the top so you still have enough wood to make the bird’s feathery tail.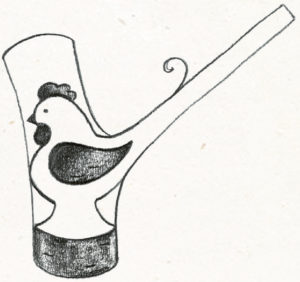
4. For good curling, let the branch dry for one or two days before carving the tail feathers.
5. Make the tail feathers by holding the tail piece and pushing the knife forwards along the grain with your thumb (see figure).
6. Trim the shape of the tail and any excess wood.
About the Book
 Easy Wood Carving For Children includes 180 colour illustrations and easy to follow step by step instructions to create everything from a tumbling tower game and dolphin necklace, to coat hooks and picture frames.
Why not have a go yourself and let us know how you did on Facebook, Twitter, Instagram and Pinterest.


Other Floris Books you might like: